
Get Any PC, New or Old, Ready for Everyday Use
Customize your system settings, update drivers, get rid of built-in software you don't want, and more.
If you break your brand-new PC in right, you can keep trouble at arm's length. During break-in, you'll set the system to standby or hibernate, schedule your backups, and customize Windows' appearance to your specific taste. Of course, you can improve any PC's performance and security by disabling many of Windows XP's automatic settings, and by activating certain features that Microsoft leaves off by default. You'll also want to rid a new PC of various preloaded applications and trial versions that you don't really need, and install and configure a couple of other programs designed to keep you safe and productive. Finally, you can take a few minutes to turn off many of Windows' more annoying and useless frills.
It may take a while to fine-tune everything, but in the end, you can point to your computer and say "There are many PCs like it, but this one is mine." These steps will improve the performance of any system, whether you've been using It for hours or years, and they'll reduce your irritation factor substantially. (Note that the steps described here are for XP Pro, but they should work with other versions of XP as well, though the options may be slightly different.)
Step 1: Show the My Computer icon
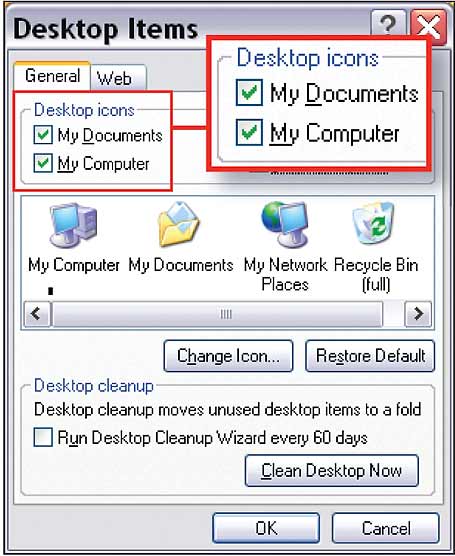
This desktop shortcut provides fast access to the Device Manager, your Services list, and other settings you're likely to need when you set up your PC and when you make changes later. Unfortunately, Windows XP doesn't display the My Computer icon on the desktop by default. To add it, right-click an empty area of the desktop, choose Properties, and click Desktop, Customize Desktop. Check My Computer and any other icons--such as My Network Places--that you want on your desktop (see Figure 1: Make sure your My Computer icon appears on the desktop by checking this option in the Desktop Items dialog box.). You may wish to uncheck Internet Explorer if you don't open the browser via that desktop shortcut (it also appears on XP's Start, All Programs menu). And since I prefer to clean my own desktop, I uncheck Run Desktop Cleanup Wizard every 60 days.
Step 2: Disable unnecessary settings
For security reasons, I disable XP's Remote Assistance and Remote Desktop features. (Your PC vendor may use these features for online support, but they create potential access points for malware.) To close the door, right-click My Computer, Choose Properties to open the System Properties dialog box, select the Remote tab, uncheck all the options, and click Apply.
To improve my system's performance, I turn off most of Windows' fancy visuals, such as those that slide, fade, and otherwise animate menus and list boxes. (I prefer a menu that snaps into position as soon as I click something.) To disable these effects, click the Advanced tab in the System Properties dialog box, and choose the Settings button in the Performance section. Then uncheck the boxes on the Visual Effects tab to turn off the features you don't want or need. I leave 'Show shadows under mouse pointer' checked to make the pointer easier to find on the screen; and because I like seeing a window's contents while I drag it, I keep that box checked as well. But I turn off the other shadows and fading, sliding, and smoothing features by clearing their boxes. When you're done, click Apply.
Step 3: See the Blue Screen of Death
Another troublesome feature is easy to dispatch via the System Properties dialog: On the Advanced tab, choose Settings in the Startup and Recovery area, uncheck Automatically restart, and click OK. Now if XP crashes and shows you the dreaded blue screen, you'll be able to record the error message so you can perform some in-depth troubleshooting. Otherwise, Windows will restart immediately, often leaving you no way to figure out what happened. In a worst-case scenario--which some people encountered when they installed the Service Pack 2 update to XP--Windows blue-screens during the installation process, reboots, blue-screens again, reboots again, and continues ad infinitum. If you ever need to force a restart when this feature is unchecked, just hit your PC case's reset button.
Step 4: Check your drivers
In the System Properties dialog box, click the Hardware tab and then the Device Manager button. A yellow question-mark icon next to an entry indicates that a necessary driver isn't loaded for that device. You may need to load it manually from the CD accompanying your PC or motherboard. Double-click the entry, choose the Driver tab, select the Update Driver button, and follow the prompts, pointing to the folder containing the driver on the installation CD when instructed to do so. (Note that even with a brand-new PC, a more recent version of the driver may be available on the device manufacturer's Web site.)
Step 5: Patch, patch, patch
Now that you have established control over the PC, it's time to hit up Microsoft for the latest Windows fixes. But be warned: Until you download and install all the latest drivers and patches for Windows, the only sites you should open in Internet Explorer are your hardware vendors' page (to download driver updates) and update.microsoft.com (where you can load Microsoft Update, which does the same thing as Windows Update but can also find and load fixes for Office and other Microsoft programs). The two PCs I used as test beds for this story, both preloaded with Windows XP SP2, required 45 critical security patches the first time they connected to Microsoft Update. On my DSL line, the Process took about 30 minutes from first connection to last reboot. At least Microsoft has the patching trick down; I guess lots of practice makes perfect.
Step 6: Tweak your way to speed and safety
Microsoft's Tweak UI is so useful that it's one of the first tools I install on a new PC, and one of the first shortcuts I put on my desktop. Few Windows tools are more helpful for making the operating system look and work just the way you want it to.
To reduce the delay before a submenu appears when you hover over it, double-click Mouse in the left pane, click Hover, and change the time, in milliseconds, in the 'Hover time' box. And if you would like My Computer to appear as the first icon on screen when you clean up your desktop, double-click Desktop, choose First Icon, and click My Computer.
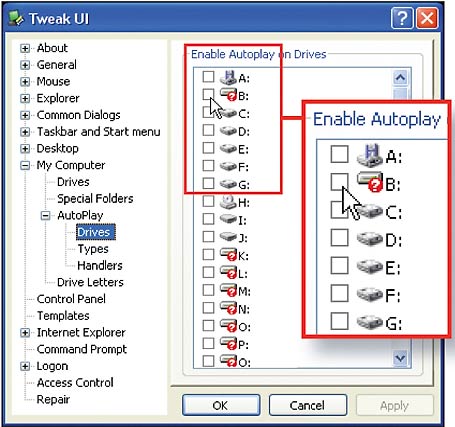
AutoPlay is the Windows feature that let Sony install its rootkit-like digital rights management software on so many PCs without detection. If you don't mind having to start your CDs manually by double-clicking their icon on the drive's menu or folder under My Computer, you can improve security by turning off AutoPlay for CDs and removable drives: Double-click My Computer, double-click AutoPlay, choose Types, and uncheck both items.
If you want to disable AutoPlay on all of your drives, choose Drives in the left pane, uncheck all 26 drive letters, and finish by clicking OK (see Figure 2: To play it supersafe, use this Tweak UI setting to block all of your drives from running applications automatically. ).
Step 7: Disable unneeded System
Tray appsMost system-tray applets squander RAM and CPU cycles to little or no purpose. Check out Scott Spanbauer's "" from his October 2004 feature, "Keep It Simple." That article is A terrific primer for reducing application and system clutter.
Step 8: Lose the XP-style Start Menu
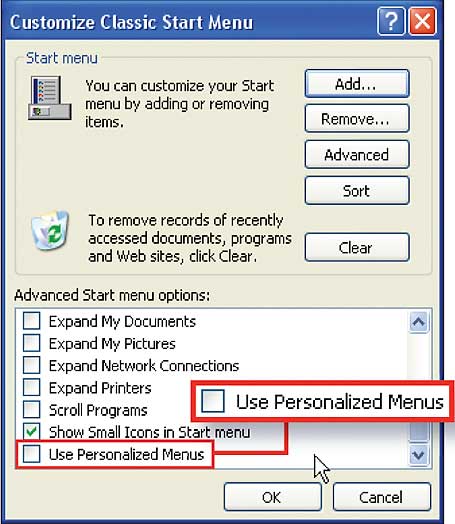
To me, XP's Start Menu feels like a step backward. To revert to the older version, right-click the Start button, choose Properties, and click Classic Start menu. Next, click the Customize button; and check three options in the 'Advanced Start menu options' box: Display Administrative Tools, Expand Control Panel (which lets you get to the applet that you need without having to open the whole Control Panel window), and Show small icons in Start menu (which keeps everything tidy). Most important, scroll to the bottom of that list of options and uncheck Use personalized menus, which gets rid of the annoying feature that makes the OS pause before showing you all of your options (in the Start menu, at least); see Figure 3: Make your Start menu shortcuts appear right away by unchecking this Taskbar and Start Menu Properties option..
Step 9: Set Windows Explorer's folder views
To change the view for all of your folder windows, open a window (one way is by double-clicking My Computer), click View, Details, and choose Tools, Folder Options. Select the General tab and click Use Windows classic folders. Click the View tab, and check Display file size information in folder tips, Display the contents of system folders, Display the full path in the address bar, and Show hidden files and folders. Uncheck Hide extensions for known file types and Use simple file sharing. Disabling that last option actually turns on the Security tab in the Properties dialog box of your files and folders. Finally, click Apply to All Folders, OK.
Step 10: Dump the 'Are You Sure?' warning
Yes, I'm sure I want to place those files in the Recycle Bin, right now. To keep this nagging dialog box at bay, right-click the Recycle Bin, select Properties, and uncheck Display delete confirmation dialog. Another unnecessary annoyance bites the dust.
Step 11: Turn off the Windows logo screen saver
The only saving my LCD screen needs is from Microsoft's obnoxious floating Windows XP logo. To get rid of it, right-click the desktop, choose Properties, click the Screen Saver tab, select (None) on the drop-down menu, and click OK.
Step 12: Start and stop silently
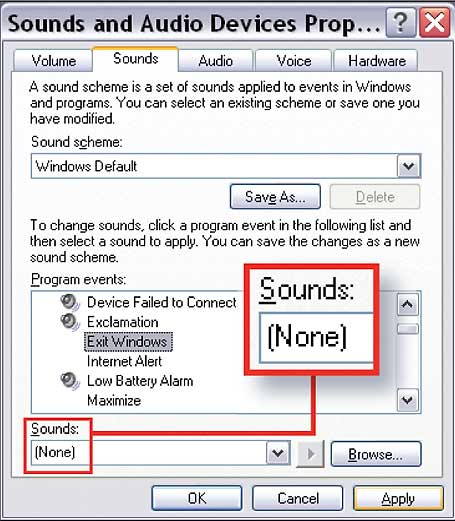
To mute Windows' startup and shutdown sounds, click Start, Settings, \0x200BControl Panel (or just Start, Control Panel if you ignored my advice in Step 8). Next, choose Sounds and Audio Devices, and click the Sounds tab. Scroll through the list under Program events, select Exit Windows, and choose (None) in the Sounds drop-down menu (see Figure 4: Choose '(None)' under 'Sounds' for Exit Windows and for Start Windows to give Windows' tired fanfares the hook.). Do the same for Start Windows, and click Apply. If you'd like your system to be completely soundless, choose No Sounds under Sound scheme. When you're done, click OK.
Step 13: Toss the Arcadian rhapsody background
Are you sick of peering at the same rolling, green hills on your desktop? A richly detailed background photograph uses a lot of system memory. I paid good money for my RAM, and I want my applications using it, not some hokey picture. I also prefer to use a plain black desktop background instead of "Microsoft Blue," which just hurts my eyes after a while. To remove your desktop wallpaper, right-click the desktop, choose Properties, click the Desktop tab, and select (None) on the list of Backgrounds. To make your desktop black, choose that color swatch from the Color drop-down menu, and click OK.
Step 14: Disable unnecessary Windows services
Right-click My Computer, choose Manage, and in the Computer Management window, double-click Services and Applications in the left pane. Select Services, and in the right pane, you'll see a list of Windows services. Double-click each of the following items one at a time, and choose Disabled from the Startup Type drop-down menu for each, and click OK: Clipbook, Messenger, Remote Registry, Server, Telnet, and Terminal Services. If you don't already know what these things are, you definitely won't need them.
Step 15: Configure Internet Explorer
Microsoft has a lot of nerve taking me to MSN when I open IE. To change your home page, open Internet Explorer, click Tools, Internet Options, and enter the URL of your Web destination of choice in the Address field under 'Home page' (May I recommend http://www.pcworld.com/?) Or click the Use Blank button, and click OK. Now click the Advanced tab, and under Settings select Do not search from the address bar so you don't inadvertently end up back at MSN.
Step 16: Install the User Profile Hive Cleanup Service
Many XP systems shut down slowly. To add some zip to your shutdowns, which speeds up shutdown and also keeps your system running smoothly by preventing a common bug.
Step 17: Take control of the taskbar
The Taskbar and Start Menu Properties dialog box lets you disable another "personalization" feature of dubious usefulness: the disappearing System Tray. Click the Taskbar tab, and uncheck Hide inactive icons. If it's not checked already, select Show Quick Launch, and if it's checked, unselect Lock the taskbar (which blocks you from customizing the Quick Launch bar). You can also uncheck Group similar taskbar buttons, which prevents you from seeing separate buttons in Quick Launch for all your open windows. (See this month's Windows Tips column "Move Quickly Between Your Open Windows.")
Content by:![]()
4/28/07
Get Any PC, New or Old, Ready for Everyday Use


Subscribe to:
Post Comments (Atom)


No comments:
Post a Comment